티스토리 뷰
반응형
Inmemory User
- 현재 기본으로 생성되는 유저와 패스워드

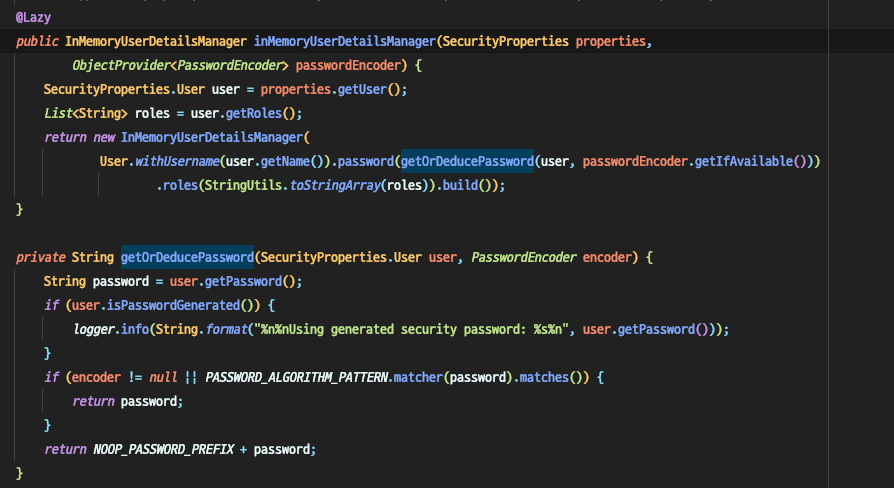
log를 확인해보면 UserDeatilsServiceAutoConfiguration에서 찍히는걸 확인할 수 있습니다.
- UserDetailsServiceAutoConfiguration.java

User 정보는 SecurityProperties에서 가져오며 name, password, role을 설정 할 수 있습니다.
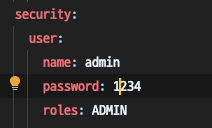
- yml 수정하여 기본 생성되는 유저 정보 변경하기

application.yml
http://localhost:8080/login 에 접속하여 properties에 작성한 ID, Password를 입력해주면 기존처럼 접속이 가능합니다..
문제점
- 유저 정보가 1개밖에 없다.
- 소스를 보면 어떤 유저정보가 있는지 확인할 수 있다.
-> 그러므로 유저정보를 properties로 설정하지 않겠습니다.
개선
Security Configration 파일에서 유저 정보를 추가해주겠습니다.
@Configuration
@EnableWebSecurity
public class SecurityConfig extends WebSecurityConfigurerAdapter {
    //...
    @Override
    protected void configure(AuthenticationManagerBuilder auth) throws Exception {
        auth.inMemoryAuthentication()
                .withUser("alxndr").password("{noop}1234").roles("USER").and()
                .withUser("admin").password("{noop}4321").roles("ADMIN");   // {PREFIX}password
    }
    //...
}
{noop}은 PasswordEncoder 에게 어떠한 형식으로 암호화되었는지 알려주는 Prefix입니다. {bcypt}, {sha256}등이 있습니다.
확인
프로젝트를 재시동 후 localhost:8080/login으로 접속하여 alxndr 계정으로 로그인 후 /info를 접속해보면 잘 되는 것을 확인 할 수 있으며,
/admin을 접속할 시 alxndr 계정은 USER 권한만 가지고 있으므로 접근이 안되는 것을 알 수 있습니다.
admin 계정으로 접속하면 모두 접근 할 수 있는 것도 확인 할 수 있습니다.
반응형
'Dev > Spring' 카테고리의 다른 글
| [security] 4. PasswordEncoder 설정하기 (0) | 2021.05.11 |
|---|---|
| [security] 3. JPA와 Security 연동 (0) | 2021.05.11 |
| [security] 1. 기본 설정 (0) | 2021.05.11 |
| Spring @EventListner 사용해보기 - 2 (0) | 2020.11.22 |
| Spring @EventListner 사용해보기 (0) | 2020.11.18 |
댓글
공지사항
최근에 올라온 글
최근에 달린 댓글
- Total
- Today
- Yesterday
링크
TAG
- spring web
- howtoinstallnginx
- Spring
- boot
- 스프링시큐리티
- like절
- paawordencoder
- JPA
- Python
- 스프링부트
- 유사결과
- 개발
- QueryDSL
- @formula
- mapstruct
- springboot
- Java
- java11
- FastAPI
- springsecurity
- Security
- ubuntu
- 스프링
- 웹서비스
- ControllerAdvice
- ResourceHttpReqeustHandler
- API
- booleanExpression
- 스프링부트 시작하기
- 자바
| 일 | 월 | 화 | 수 | 목 | 금 | 토 |
|---|---|---|---|---|---|---|
| 1 | ||||||
| 2 | 3 | 4 | 5 | 6 | 7 | 8 |
| 9 | 10 | 11 | 12 | 13 | 14 | 15 |
| 16 | 17 | 18 | 19 | 20 | 21 | 22 |
| 23 | 24 | 25 | 26 | 27 | 28 | 29 |
| 30 |
글 보관함
